| View previous topic :: View next topic |
| Author |
Message |
brian

Joined: 22 Aug 2011
Posts: 3769
Location: Australia
|
 Posted: Wed May 06, 2020 10:32 am Post subject: Re: DB2J 400 22x/106 Posted: Wed May 06, 2020 10:32 am Post subject: Re: DB2J 400 22x/106 |
 |
|
| welshlamb wrote: |

Hopefully you'll agree with my estimation of its aesthetics as TERRIBLE. |
Nah.... all it needs is the seats recovered and a dust off 
I do remember seeing that one for sale
.
_________________
'99 DB4 #104, '96 SB6 #1165, '94 DB2 J #652, '99 DB4 #088, '08 VTX1800, '93 ZXR750R M1, '95 ZXR750, '95 ZXR750 Race Bike, '94 CBR400rr NC29 Race Bike, '94 CB250, '49 BSA C10 250, '61 BSA A10 650, '89 ZXR750, '91 Ducati 851 |
|
| Back to top |
|
 |
welshlamb

Joined: 09 Mar 2011
Posts: 592
Location: South Wales , Nr. Abergavenny
|
| Posted: Wed May 06, 2020 9:42 pm Post subject: Re: DB2J 400 22x/106 |
|
|
| brian wrote: |
Nah.... all it needs is the seats recovered and a dust off
. |
Typical Aussie racer talk! no F***n excuses!
_________________
Not as many bikes as I would like and already too many to keep up with! |
|
| Back to top |
|
|
welshlamb
Joined: 09 Mar 2011
Posts: 592
Location: South Wales , Nr. Abergavenny
|
| Posted: Wed May 06, 2020 9:45 pm Post subject: |
|
|
| rOLLI wrote: |
By the way, still searching such a rear seat for DB2
|
WHich bits are you looking for exactly Roland.. The seat and bum-stop pieces that attach to the main seat /tank unit?
_________________
Not as many bikes as I would like and already too many to keep up with! |
|
| Back to top |
|
|
roli57

Joined: 10 Sep 2011
Posts: 15
Location: Germany
|
| Posted: Mon May 11, 2020 10:31 pm Post subject: |
|
|
Hy,
a few weeks ago I took apart the handlebars of my DB1. The construction looks exactly like the DB2 I think.
There are two tubes inserted into the aluminium housing. The 300mm long chromed tube. Inside the long tube is a short sleeve, which is a little bit longer than the aluminium housing.
The hole in the aluminum housing is only 22.01mm at both ends. In the middle the hole diameter is 22,2mm.
With the inner short tube the long tube was widened and pressed into the 22.2mm of the aluminium hole. Thus the steering tube is fixed.
The steps of disassembly:
1. saw off the long tube 5mm before the aluminium.
2. saw the inner tube in longitudinal direction to remove the tension.
3. press out only the inner tube with a suitable shaft.
4. press out the outer tube with a suitable shaft. Cardboard under the aluminium prevents scratches.
That's it.
As a new steering tube I used stainless steel water pipe. I used Loctite 648 and glued it into the aluminium part. The aluminium part I heated up to 120°C before. Then you have to be fast! A hydraulic press will help well, then it works perhaps also without heat...
Greetings Rolf


and the result:

_________________
sorry for my bad language
Bikes: Ducati Pantah + Cagiva Alazzurra Custom + 2 x Bimota DB1 + Honda Clubman 650 + KTM-SOS-Racer
Last edited by roli57 on Wed May 13, 2020 6:52 pm; edited 1 time in total |
|
| Back to top |
|
|
welshlamb
Joined: 09 Mar 2011
Posts: 592
Location: South Wales , Nr. Abergavenny
|
| Posted: Tue May 12, 2020 8:19 pm Post subject: |
|
|
Wow, very brave Rolli, but i guess with a bent bar you didn't have too much to lose. The tube new tube says 22.0mm on it. Did it measure that exactly? German precision if it did as usually you expect some tolerance + or -. Any way, very interesting and one to file for reference should I or anyone need it!
_________________
Not as many bikes as I would like and already too many to keep up with! |
|
| Back to top |
|
|
2bims

Joined: 03 Apr 2010
Posts: 7291
|
| Posted: Tue May 12, 2020 9:15 pm Post subject: |
|
|
| welshlamb wrote: |
| Wow, very brave Rolli, but i guess with a bent bar you didn't have too much to lose. The tube new tube says 22.0mm on it. Did it measure that exactly? German precision if it did as usually you expect some tolerance + or -. Any way, very interesting and one to file for reference should I or anyone need it! |
I take it thats a "no" for you to replicate that work then Lambie?...and I have to say...I dont blame you.....cutting off your clip on....so that you can get undo a hacksaw blade and slot it through the hole and remake and saw away to release the inner tube.....press out..and press out...and heat and glue...Ahhhhhhhhh
.Run for the hills.....I applaud and commend Rolis work...but that aint for me.... |
|
| Back to top |
|
|
roli57
Joined: 10 Sep 2011
Posts: 15
Location: Germany
|
| Posted: Wed May 13, 2020 6:09 pm Post subject: |
|
|
| Quote: |
The tubes could do with rechroming. Has anyone taken these style clip ons apart before? It looks like the tube is just a press fit but maybe there is an inner tube (hard to see) that is hammered in to expand the tube into the alloy piece. I don't want to damage it so any thoughts/guidance would be appreciated. |
I just wanted to answer that question. If the pipes are rusted, it's a solution 
It reads more complicated than it is. I'm sure we're all good at dismantling.
Greeting Rolf
_________________
sorry for my bad language
Bikes: Ducati Pantah + Cagiva Alazzurra Custom + 2 x Bimota DB1 + Honda Clubman 650 + KTM-SOS-Racer |
|
| Back to top |
|
|
DB1 860
Joined: 23 Mar 2014
Posts: 177
Location: Sydney
|
| Posted: Thu May 14, 2020 12:22 am Post subject: |
|
|
| roli57 wrote: |
| Quote: |
The tubes could do with rechroming. Has anyone taken these style clip ons apart before? It looks like the tube is just a press fit but maybe there is an inner tube (hard to see) that is hammered in to expand the tube into the alloy piece. I don't want to damage it so any thoughts/guidance would be appreciated. |
I just wanted to answer that question. If the pipes are rusted, it's a solution
It reads more complicated than it is. I'm sure we're all good at dismantling.
Greeting Rolf |
Ive had my local shop replace the the bars of my DB1 twice, the first time after the bike fell off the side stand bending the bar, and the second time when I wanted longer bars [ an improvement I think ] he did it quite easily using a press. |
|
| Back to top |
|
|
welshlamb
Joined: 09 Mar 2011
Posts: 592
Location: South Wales , Nr. Abergavenny
|
| Posted: Sat May 23, 2020 11:24 am Post subject: Re: DB2J 400 22x/106 |
|
|
| brian wrote: |
Nah.... all it needs is the seats recovered and a dust off
. |
Oh I do like a sense of humour, keeps us all going when we
.....loose /cant find tool (especially the 10mm socket!)
.....realise a tool doesn't work
.....or a part doesn't fit
.....or lose the 'special' part you know you had last week etc etc.......
In any case, in between other jobs the seat unit was stripped down. After much scraping/filling/sanding, inspection.... repeat , repeat again it sort of looks like this,
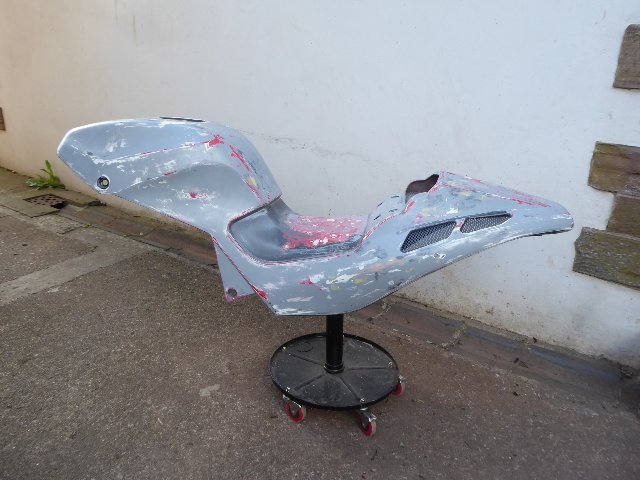

Actually it looks a bit better than this now as these photos were taken after 'round one'. You can see the original DB400J paint scheme showing through in places. before it got the grey and silver 'hot-rod flames' treatment.
In for a penny in for a pound I removed the mesh 'vents' at the rear so that any paint/wrap can be done properly. These had been installed with a total lack of care but copious (if uneven) amounts of filler. Out of sight out of mind I guess!

Dremel to the rescue to weaken the bond enough to remove the mesh which I will be able to use as a template for replacement.
 pic hosting pic hosting
I'm now just waiting for some weather to allow a primer coat outside to see how it looks, but after several days in mid 20's and blue skies, yesterday and today are showers and very blustery.. Heh ho!; plenty to get on with (Including replacing a ridge tile that came off in the wind!) and theres the seat and bumstop to look at 
_________________
Not as many bikes as I would like and already too many to keep up with!
Last edited by welshlamb on Sat May 23, 2020 11:52 am; edited 1 time in total |
|
| Back to top |
|
|
welshlamb
Joined: 09 Mar 2011
Posts: 592
Location: South Wales , Nr. Abergavenny
|
| Posted: Sat May 23, 2020 11:49 am Post subject: Sitting comfortably? |
|
|
Well........ The bum stop and seat always were going to be stripped for recovering, so let the fun begin!
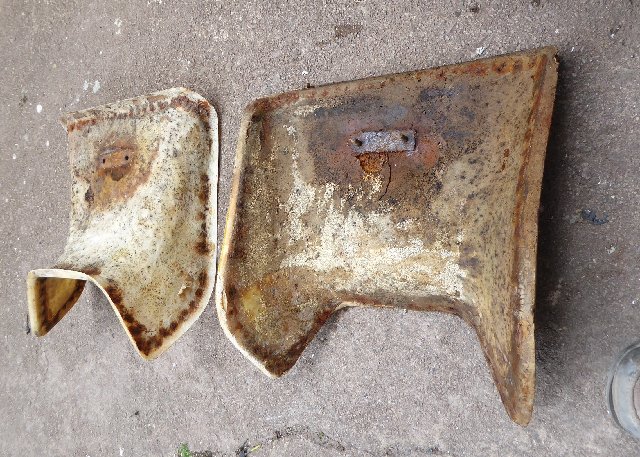
Easing the vinyl cover off the bum stop first (the staples had long since rusted and 99% of the attachment was now the glue) it was good to see that the fibre glass base was reasuringly thin (1-2mm) and light and the moulded foam good enough to reuse no problems.
Fittings are a bit corroded but should clean up. The 'rough arse' finish on the fibreglass does look a bit out of place though so might get a (very!)light sand and coat or two of laquer before it gets put back together.

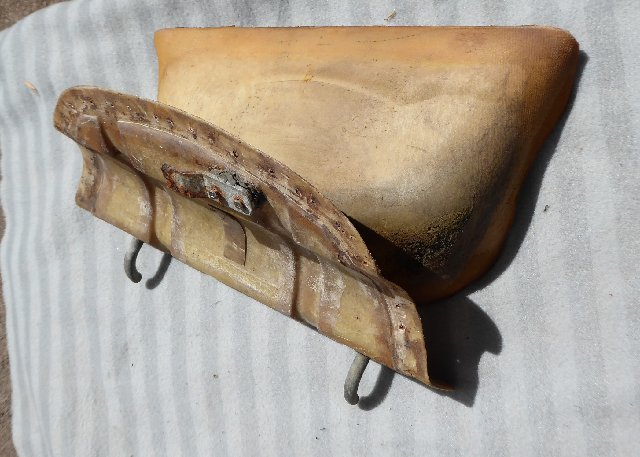
The seat unit was another matter though!  . .
I had noticed when weighing bits and pieces that the bum stop weighed 380g but the main seat a whopping 1430g.
As soon as I got the vinyl off I could see why that was... the foam was sodden with water. The vinyl had two small punctures in it (maybe 1.5mm each) but must have been letting in water for a long time. It looked and felt horrible.
The foam is currently next to the hot water tank draining and drying out. I will leave it for a few days but even after 24hrs I can feel a big difference in weight. I'm hoping that the foam looks worse than it is and I should be able to replace the glued on anchor plate that allows bolting to the main tank/seat unit. Fingers crossed
_________________
Not as many bikes as I would like and already too many to keep up with! |
|
| Back to top |
|
|
2bims
Joined: 03 Apr 2010
Posts: 7291
|
| Posted: Sat May 23, 2020 3:48 pm Post subject: |
|
|
| Coming along slowly but then Rome wasn't built in a day.....and "past the worst" which is when restoring you have to strip back and it looks far worse than when you started......Wickes do a good line in varying Mesh grilles in small panels....Personally....although I understand your reasoning....I wouldn't have removed the mesh.....It is....undeniably....an absolute pig to reaffix.....even if with new glue...new mesh.....as the mesh and fibreglass just dont seem to want to go together.....trying to bend the mesh so it sits flat.....then "what type of glue"....or 2-pack epoxy......and the darn mesh just wants to peel off and come loose every single time...and its a pig to find how to clamp them during the glue going off...and glue or epoxy dripping round onto new paint etc etc....I fitted a piece on the supercity that was missing...has to be one of the most frustrating tasks I've ever attempted.....comes way higher than siliconing around a bath....or removing the old silicone...etc etc....Much swearing was had....what a Nightmare.....You will surely turn the Welsh Air Blue.....just tell the Mrs to go shopping for 24hrs...as she will think youre whipping up a murderous holocaust in your man cave if shes in ear shot.....I can "imagine" that the proper way is bonding it in with wet layers of fibreglass....but I had none...Skip Clear colourless tank sealant also...that does nothing....2=pack epoxy...>Nope......2-pack araldite....nope neither...gel Superglue...Nope...Bostick...nope again.....I was tempted to rivet or bolt them in with form D washers buy the time I finished..... |
|
| Back to top |
|
|
hindsight

Joined: 13 Feb 2010
Posts: 126
Location: Central Scotland
|
| Posted: Sat May 23, 2020 7:24 pm Post subject: |
|
|
| I feel your pain Steve - I've had good results gluing that kind of mesh with a hot glue gun. |
|
| Back to top |
|
|
2bims
Joined: 03 Apr 2010
Posts: 7291
|
| Posted: Sat May 23, 2020 10:03 pm Post subject: |
|
|
| hindsight wrote: |
| I feel your pain Steve - I've had good results gluing that kind of mesh with a hot glue gun. |
Hot glue gun....theres an idea...if I had one....Does the glue go off real quick and set?....I overmixed 2 pack araldite 5minute stuff with more hardener....but still had to hold for ages....in Small print....the 5mins stuff says "sets proper after 24 hrs"....hardly 5 minute stuff then is it? |
|
| Back to top |
|
|
brian
Joined: 22 Aug 2011
Posts: 3769
Location: Australia
|
| Posted: Sun May 24, 2020 2:08 am Post subject: |
|
|
My thoughts would be to fibreglass over the edges too Steve. Youd still have to try to shape it correctly though to get it to sit flat while the resin sets
_________________
'99 DB4 #104, '96 SB6 #1165, '94 DB2 J #652, '99 DB4 #088, '08 VTX1800, '93 ZXR750R M1, '95 ZXR750, '95 ZXR750 Race Bike, '94 CBR400rr NC29 Race Bike, '94 CB250, '49 BSA C10 250, '61 BSA A10 650, '89 ZXR750, '91 Ducati 851 |
|
| Back to top |
|
|
hindsight
Joined: 13 Feb 2010
Posts: 126
Location: Central Scotland
|
| Posted: Sun May 24, 2020 7:40 am Post subject: |
|
|
| 2bims wrote: |
| Does the glue go off real quick and set?... |
Yes, within minutes, it's fully cooled and hardened. |
|
| Back to top |
|
|
|


